mindmap:

Module 1: Writing Code
Revisiting four Steps of devising algorithm
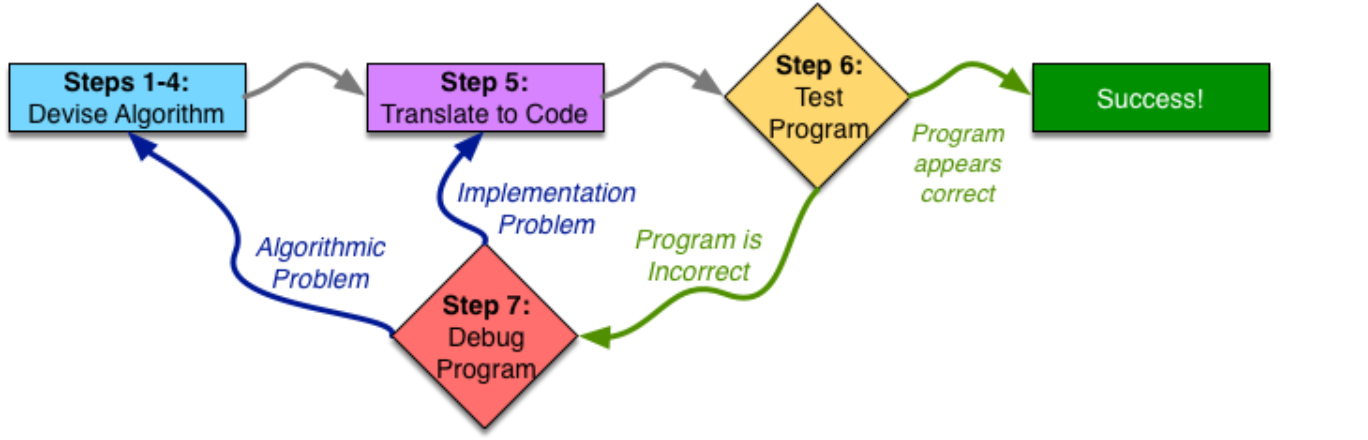
Revisiting Step 1:
The first step to devising an algorithm is to work an instance of the problem yourself. However, you have to not only be able to do the problem, but also do it methodically enough that you can analyze what you did and generalize it.
Revisiting Step 2:
Write Down What You Just Did. (for example, that the price of bread , we will have to find a way to properly represent a rectangle using a number (or several))
Step 3: Generalizing Values, Repetitions, Conditional Behavior
we need to generalize to all instances of the problem, think about why you did what you did, recognize patterns, and figure out how to deal with any possible inputs.
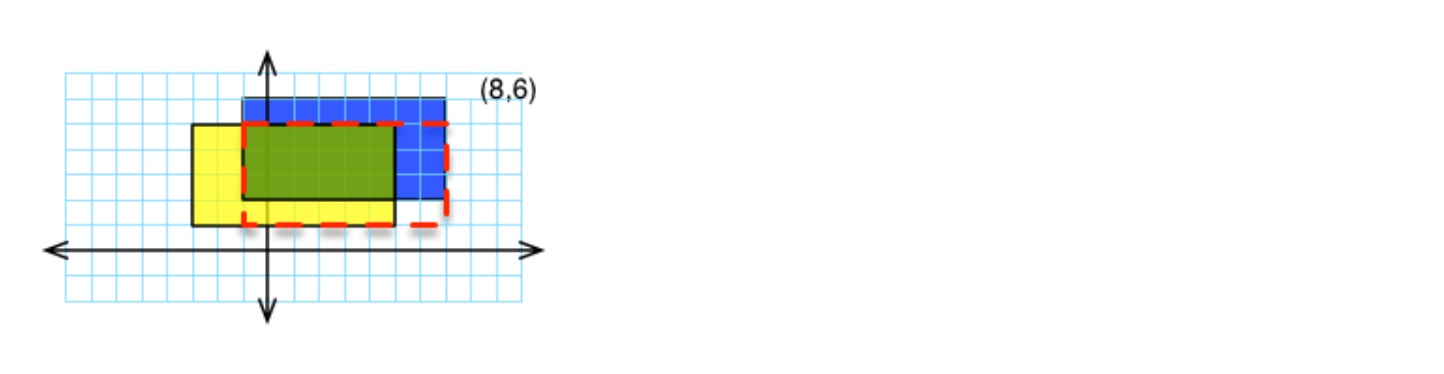
To find the intersection of two rectangles, r1 and r2:
Make a rectangle (called ans) withleft: maximum of r1’s left and r2’s left
bottom: maximum or r1’s bottom and r2’s bottom
right: minimum of r1’s right and r2’s right
top: minimum of r1’s top and r2’s topThat rectangle called ans is your answer.
Revisiting Step 4: Test Your Algorithm
Once you have generalized your Algorithm, it is time to test it out——enough different testing to give you confidence that your algorithm is correct before you proceed, but not an excessive amount of testing.
- Try test cases that are qualitatively different from what you used to design your algorithm.
- Try to find corner cases—inputs where your algorithm behaves differently.
- Try to obtain statement coverage—that is, between all of your test cases, each line in the algorithm should be executed at least once.
- Examine your algorithm and see if there are any apparent oddities in its behavior
Step 5: Translation to Code
acquaint a programmer’s editor (Emacs or Vim) and use it whenever you program
Function declaration
We should start Step 5 by writing down the declaration of the function that we are writing, with its body (the code inside of it) replaced by the generalized algorithm from Step 3, written as comments.
- figure out its parameter types and return type.
- a rectangle could be represented as four numbers—suggesting a struct.
- types of numbers
translating Algorithm Components
- Repetition -> for loop, do-while, while loop; break statement, continue statement
- Decision Making -> if/else or switch/case
- Complicated Steps -> call another function
struct rect_tag {
	float left;
	float bottom;
	float top;
	float right;
};
typedef struct rect_tag rect_t;

float minimum(float f1, float f2) {
	// compare f1 to f2
	if (f1 < f2) {
		// if f1 is smaller than f2, then f1 is your answer
		return f1;
	}
	else {
	// otherwise, f2 is your answer
		return f2;
	}
}

float maximum(float f1, float f2) {
	// compare f1 to f2
		// if f1 is larger than f2, then f1 is your answer
		// otherwise, f2 is your answer
	return (f1 > f2) ? f1 : f2; //三元运算符,先判断,若成立返回表达式1
}

// To find the intersection of two rectangles, r1 and r2:
rect_t intersection(rect_t r1, rect_t r2) {
	// Make a rectangle (called ans) with
	rect_t ans;
	// left: maximum of r1's left and r2's left
	ans.left = maximum(r1.left, r2.left);
	// bottom: maximum or r1's bottom and r2's bottom
	ans.bottom = maximum(r1.bottom, r2.bottom);
	// right: minimum of r1's right and r2's right
	ans.right = minimum(r1.right, r2.right);
	// top: minimum of r1's top and r2's top
	ans.top = minimum(r1.top, r2.top);
	// The rectangle called ans is your answer
	return ans;
}
Top-down design 自顶向下设计
The process of taking large, complex pieces, and separating them out into their own function—known as top-down design —is crucial as you write larger and larger programs.
Emacs编辑器基本用法
- 文件操作:
C-x C-f打开 / 创建文件;C-x C-s保存文件 - 窗口与缓冲区:
C-x 2水平分屏;C-x b切换缓冲区;C-x o切换窗口 - 编辑:直接输入文本,
Enter换行 - 挂起 Emacs:
C-z - 恢复 Emacs:
fg - 退出:
C-x C-c关闭 Emacs - compile from within Emacs :
C-cC-v(注:C-代表按住Control键)
some useful features of the Emacs editor, as follows:
- Searching in Emacs:
- Incremental Search: By pressing
Ctrl+S, Emacs initiates an incremental search. As you type, it searches for the typed text and highlights all instances. You can refine the search by typing more characters. - Backward Search: Pressing
Ctrl+Rallows for backward searching. You can switch between forward and backward searches usingCtrl+SandCtrl+R. - Screen Redraw: If the screen doesn’t redisplay correctly, press
Ctrl+Lto make Emacs redraw the screen.
- Incremental Search: By pressing
- Undoing Changes:
- General Undo: Press
Ctrl+XU to undo the last change. - Undoing in a Region: Mark a region by pressing
Ctrl+Space, then useCtrl+XUto undo changes only within that region.
- General Undo: Press
- Text Manipulation:
- Moving Cursor:
Ctrl+Amoves the cursor to the beginning of the line, andCtrl+Emoves it to the end. - Cutting and Pasting:
Ctrl+Kcuts an entire line, andCtrl+Ypastes the previously cut or copied text. To copy a region, select it withCtrl+Spaceand then pressEsc+W. - Cycling through Pastes: After pasting, press
Esc+Yto cycle through previously pasted content.
- Moving Cursor:
- Keyboard Macros:
- Defining a Macro: Press
Ctrl+X( to start defining a keyboard macro. Emacs will record the sequence of commands you perform. - Executing a Macro: After defining the macro, press
Ctrl+X) to finish. Then, pressCtrl+XE to execute the macro on the next line. You can repeat the macro by pressing E.
- Defining a Macro: Press
int printTriangle(int size) {
  //start with starCount being 0
  int starCount = 0;
  //count from 0 (inclusive) to size (exclusive), for each number i that you count
  for(int i = 0; i < size; i++){
     //count from 0 (inclusive) to i (inclusive), for each number j that you count
    for(int j = 0; j <= i; j++){
        //print a "*"
      printf("*");
        //increment starCount
      starCount++;
    }
     //when you finish counting on j,
    printf("\n");
     //print a newline ("\n")
  }
  //when you finish counting on i,
  return starCount;
  //your answer is starCount
}


int main(void) {
  int numStars;
  printf("Here is a triangle with height 4\n");
  numStars = printTriangle(4);
  printf("That triangle had %d total stars\n", numStars);
  //now print "Here is a triangle with height 7\n"
  printf("Here is a triangle with height 7\n");
  //then call printTriangle, passing in 7, and assign the result to numStars
  numStars = printTriangle(7);
  //finally, print "That triangle had %d total stars\n", such that the %d
  //prints the value of numStars
  printf("That triangle had %d total stars\n", numStars);

  return 0;
}
Git在课程中的使用
git add .
git commit -m "xxx"
git push
grade # 远程服务器拉取项目并评分
git pull # 拉取评分细节
Module 2: Compiling and Running
Compiling
Once you have your code written, you need to compile it in order to be able to run it.
Compiling a program is the act of translating the human-readable code that a programmer wrote (called “source code”) into a machine-executable format.
There are many different C compilers, but we will be using gcc, which stands for “GNU Compiler Collection.”
预处理(preprocessor) -> 编译(compiler) -> 汇编(assembler) -> 连接(linker)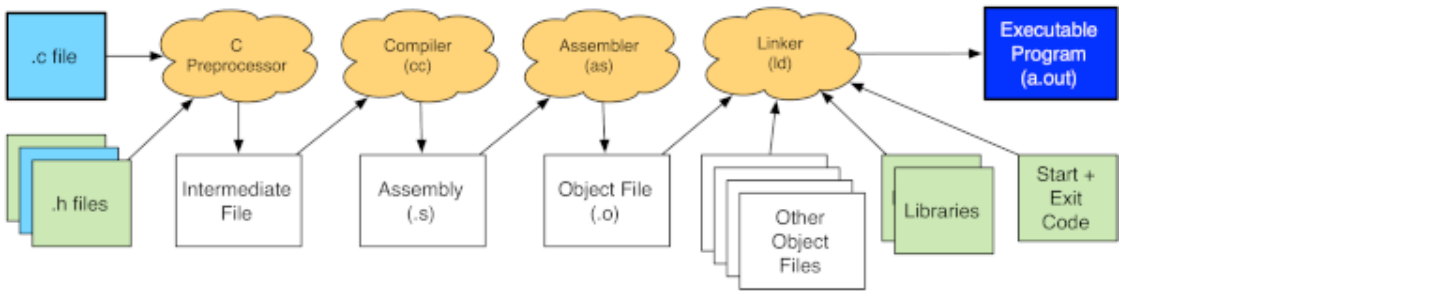
Preprocessor
include directives
#include <stdio.h>  //standard C header files
#include <stdlib.h>

#include "myHeader.h" //your own header file
these directives tell the preprocessor to literally include the contents of the named file at that point in the program source, before passing it on to the later steps of the compilation process.
these header files—and header files in general—primarily contain three things: function prototypes, macro definitions, and type declarations.
Macros
Header files may also contain macro definitions. The simplest use of a macro definition is to define a constant.
Macros can also take arguments. The preprocessor would then expand SQUARE(3) to 3 * 3, or SQUARE(45.9) to 45.9 * 45.9.the preprocessor works only with text. It expands the macro by replacing x in the macro definition with the text z-y, resulting in z-y * z-y. Note that this will compute z- (y * z) -y, which is not z-y squared.
#define EXIT_SUCCESS 0
#define SQUARE(x) x * x
#define SQUARE(x) ((x) * (x))
Compiler
GCC
gcc myProgram.c # 生成默认可执行文件a.out

gcc hello.c -o hello  # Linux/macOS
gcc hello.c -o hello.exe  # Windows(可选,默认也是.exe)
gcc -o squares -Wall -Werror -std=gnu99 --pedantic squares.c squares_test.o--std=gnu99gnu99 will match what describes in this course, and is generally a reasonable standard to program in.-Wallrequests that the compiler issue warnings for a wide range of questionable behavior,however, unlike errors, the compiler will continue and produce a program even if it warned-Werrortells the compiler to treat all warnings as errors—making it refuse to compile the program-o必须紧跟输出文件名
man Pages (manual 缩写)是 UNIX 系统中提供内置帮助的核心命令
man [参数] 目标
man -S3 printf # `-S3`指定查询手册第 3 章节(C 库),`printf`为查询的 C 库函数
man ls # 直接查询`ls`命令的手册页(默认查找对应章节)
man man
man -k compare # 搜索含 “compare” 的命令 / 函数。#include <stdio.h>
#include <stdlib.h>
/*
* Determines if coord is in range between
* offset (INCLUSIVE) and offset + size (EXCLUSIVE)
*/
int isInRange(int coord, int offset, int size) {
// if coord is in range, return // else, return 0
if(coord>=offset && coord<(offset+size)) {
return 1;
}
else {
return 0;
}
}
/*
* Determines if coord is at border of offset or
* offset + size
*/
int isAtBorder(int coord, int offset, int size) {
// if coord is equal to offest or offset + size
// return 1, else return 0
if(coord == offset || coord == offset+size) {
return 1;
}
else {
return 0;
}
}
int max(int a, int b) {
return(a>b) ? a:b;
}
void squares(int size1, int x_offset, int y_offset, int size2) {
//compute the max of size1 and (x_offset + size2). Call this w
int w = max(size1, x_offset + size2);
//compute the max of size1 and (y_offset + size2). Call this h
int h = max(size1, y_offset + size2);
//count from 0 to h. Call the number you count with y
for (int y = 0; y < h; y++){
//count from 0 to w. Call the number you count with x
for (int x = 0; x < w; x++){
//check if EITHER
// ((x is between x_offset and x_offset +size2) AND
// y is equal to either y_offset OR y_offset + size2 - 1 )
// OR
// ((y is between y_offset and y_offset + size2) AND
// x is equal to either x_offset OR x_offset + size2 -1)
// if so, print a *
if((isInRange(x, x_offset, size2) && isAtBorder(y, y_offset, size2-1)) || (isInRange(y, y_offset, size2) && isAtBorder(x, x_offset, size2-1))){
printf("*");
}
//if not,
// check if EITHER
// x is less than size1 AND (y is either 0 or size1-1)
// OR
// y is less than size1 AND (x is either 0 or size1-1)
//if so, print a #
else if((x<size1 && isAtBorder(y, 0, size1-1)) || (y<size1 && isAtBorder(x, 0, size1-1))){
printf("#");
}
//else print a space
else{
printf(" ");
}
}
//when you finish counting x from 0 to w,
//print a newline
printf("\n");
}
}Dealing With Compilation Errors
- Tip 1 Remember that the compiler can get confused by earlier errors. If later errors are confusing, fix the first error, then try to recompile before you attempt to fix them.
- Tip 2 If parts of an error message are completely unfamiliar, try to ignore them and see if the rest of the error message(s) make sense. If so, try to use the part that makes sense to understand and fix your error. If not, search for the confusing parts on Google and see if any of them are relevant.
- Tip 3 Programmer’s editors are very good at helping you find mismatched braces and parenthesis. Most will indent the code according to the nesting level of the braces it is inside, and will show you the matching brace/parenthesis when your cursor is on one of the pair. Using these sorts of features can be the easiest way to find errors from mismatched braces and parenthesis.
- Tip 4 Be confident in your fix for an error. If you do not understand what is wrong and how to fix it, find out and be sure rather than randomly changing things.
Assembling
The next step is to take the assembly that the compiler generated and assemble it into an object file. gcc invokes the assembler to translate the assembly instructions from the textual/human readable format into their numerical encodings that the processor can understand and execute.
You can request that gcc stop after it assembles an object file by specifying the -c option.
gcc myProgram.c # 生成默认可执行文件a.out
gcc hello.c -o hello  # Linux/macOS

gcc -c xyz.c # compile _xyz.c_ into xyz.o
gcc -c xyz.c -o awesomeName.o # produce an object file called awesomeName.o
Linking
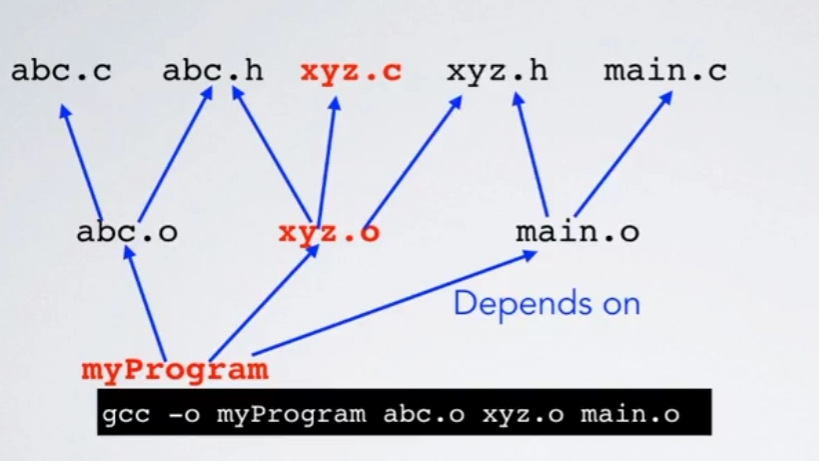
The final step of the process is to link the program. Linking the program takes one or more object files and combines them together with various libraries, as well as some startup code, and produces the actual executable binary.
Make
legitimately slacking off(合法摸鱼):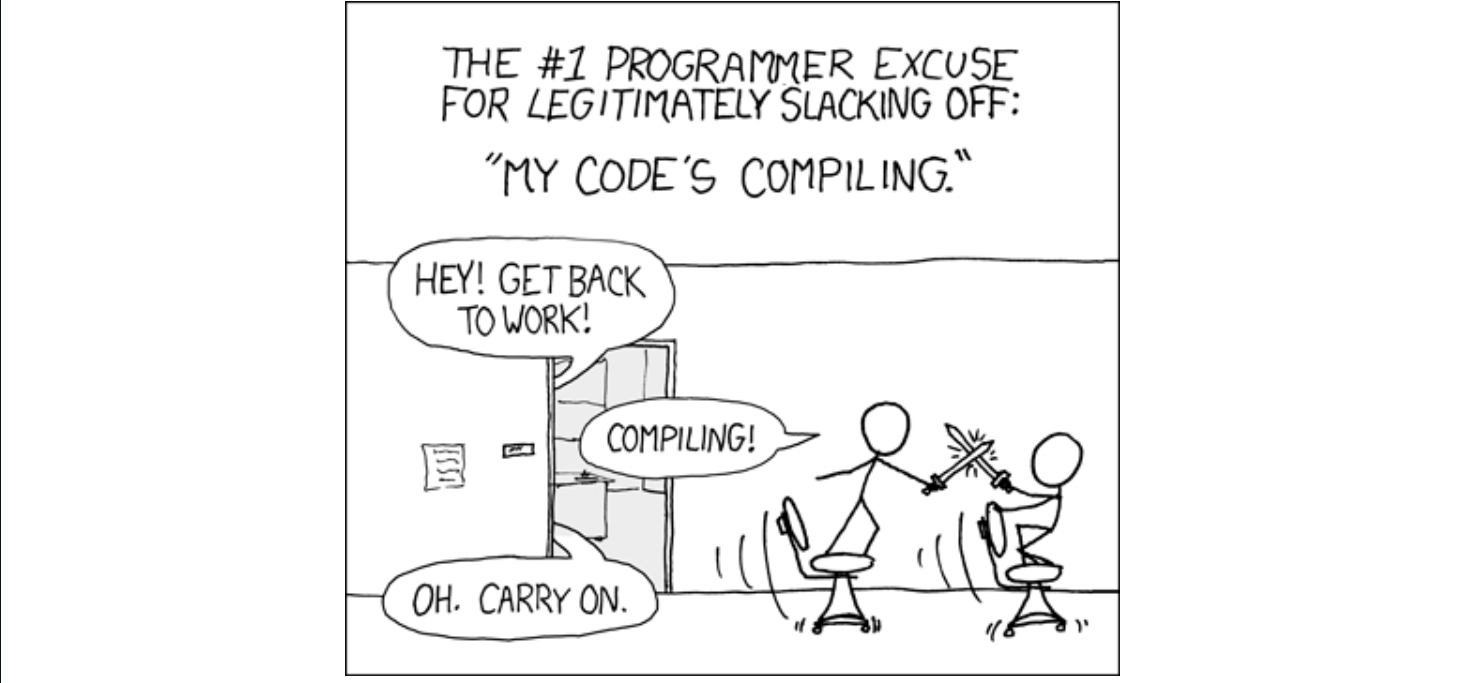
or use make!
- Tool for building large programs
- (or really building anything) Makefile specifies
- Targets: things to build
- Dependencies: inputs to build targetsfrom
- Recipes to build a target from what itdepends on
The make command reads a file called Makefile (though you can ask it to read an input file by a different name) which specifies how to compile your program. Specifically, it names the targets which can be made, their dependencies, and the rules to make the target.
myProgram: oneFile.o anotherFile.o
    gcc -o myProgram oneFile.o anotherFile.o
oneFile.o: oneFile.c oneHeader.h someHeader.h
    gcc -std=gnu99 -pedantic -Wall -c oneFile.c
anotherFile.o: anotherFile.c anotherHeader.h someHeader.h
gcc -std=gnu99 -pedantic -Wall -c anotherFile.c这个Makefile有三个目标:myProgram,oneFile,anotherFile。输入make运行后,默认先编译第一个(myProgram),它依赖于两个 .o 文件,然后会分别检查有没有oneFile.o和anotherFile.o,以及它们是不是最新的,也就是如果oneFile.c比oneFile.o新,那么就会重新编译oneFile.o,anotherFile.o同理。确保有oneFile.o和anotherFile.o才会开始编译myProgram,如果myProgram比它这两个依赖文件更新,那就不会编译(已经是ok的)
Makefile 中一个常见的目标是 clean 目标。它实际上并不会创建一个名为 clean 的文件(因此它被称为 “伪” 目标)。
.PHONY: clean
clean:
    rm -f myProgram *.o *.c~ *.h~
This target gets used to either force the entire program to be rebuilt (e.g., after you change various compilation flags in the Makefile), or if you just need to clean up the directory, leaving only the source files (e.g., if you are going to zip or tar up the source files to distribute them to someone).
伪目标声明规则:.PHONY: all clean 只是告诉 Make:“all 和 clean 是伪目标,不用检查当前目录是否有同名文件,也不用判断它们是否‘过时’,只要执行 make 目标名,就直接运行对应的命令”。
Generic rules 通用规则
# 定义变量
CFLAGS=-std=gnu99 -pedantic -Wall
myProgram: oneFile.o anotherFile.o
    gcc -o myProgram oneFile.o anotherFile.o
%.o: %.c
    gcc $(CFLAGS) -c $<
.PHONY: clean
clean:
    rm -f myProgram *.o *.c~ *.h~
oneFile.o: oneHeader.h someHeader.h
anotherFile.o: anotherHeader.h someHeader.h
优化后的核心:模式规则 + 变量
- 模式规则
%.o: %.c:用一个规则覆盖所有 “.o由同名.c生成” 的场景,消除重复代码; - 变量
$<:动态指代当前.o对应的.c文件,解决 “无法写死源文件名” 的问题。$<指代第一个依赖文件(即 %.c),$@指代目标 %.o; - 变量
CFLAGS:集中管理编译选项,修改时只需改一处,避免遗漏; - 最后补充头文件依赖。C 语言中,
.c文件会通过#include引用.h文件(如结构体定义、函数声明),但 Make 默认 “只认规则中写的依赖”。如果只写%.o: %.c(不补充头文件依赖),Make 会认为 “只有.c文件修改时才需要重建.o”;
详细解释:
| 代码片段 | 作用说明 | 关键细节 |
|---|---|---|
CFLAGS=-std=gnu99 -pedantic -Wall | 定义编译选项变量 | - -std=gnu99:指定 C 语言标准为 GNU 扩展的 C99;- -pedantic:严格检查代码是否符合标准,避免非标准语法;- -Wall:开启所有警告(Warning All),帮助提前发现潜在错误。 |
myProgram: oneFile.o anotherFile.ogcc -o myProgram oneFile.o anotherFile.o | 定义最终目标(可执行文件) 的规则 | - 目标:myProgram(要生成的可执行文件);- 依赖: oneFile.o 和 anotherFile.o(两个目标文件,必须先存在才能链接成可执行文件);- 命令: gcc -o 目标 依赖:将两个 .o 文件链接为 myProgram。 |
%.o: %.cgcc $(CFLAGS) -c $< | 定义通用模式规则(核心优化) | - 模式匹配:%.o 表示 “所有以 .o 结尾的文件”,%.c 表示 “同名的 .c 文件”(如 oneFile.o 对应 oneFile.c);- 变量 $(CFLAGS):引用前面定义的编译选项,避免重复写编译参数;- 变量 $<:Make 的内置变量,指代 “当前规则的第一个依赖文件”(此处即对应的 .c 文件,如处理 oneFile.o 时,$< 就是 oneFile.c);- 选项 -c:表示 “只编译(Compile)生成 .o 文件,不链接”。 |
.PHONY: clean | 声明 clean 为伪目标 | - 伪目标不是实际文件,仅用于触发命令(避免当前目录存在名为 clean 的文件时,Make 误判为 “目标已存在” 而不执行命令)。 |
clean:rm -f myProgram *.o *.c~ *.h~ | 定义clean目标的命令 | - 功能:清理编译生成的文件; - rm -f:强制删除(-f 避免 “文件不存在时报错”);- 清理内容:可执行文件 myProgram、所有 .o 文件、.c 和 .h 的备份文件(*.c~ 是文本编辑器自动生成的备份)。 |
oneFile.o: oneHeader.h someHeader.hanotherFile.o: anotherHeader.h someHeader.h | 补充目标文件的头文件依赖 | - 明确 oneFile.o 依赖 oneHeader.h 和 someHeader.h;- 明确 anotherFile.o 依赖 anotherHeader.h 和 someHeader.h;- 这是解决 “头文件修改后不重建 .o” 问题的精准方案。 |
Built-in generic rules
覆盖默认变量+沿用默认编译规则
# 1.覆盖默认变量(自定义编译器和编译参数)
CC = gcc
CFLAGS = -std=gnu99 -pedantic -Wall

# 2. 定义最终目标:编译myProgram可执行文件
myProgram: oneFile.o anotherFile.o
    gcc -o myProgram oneFile.o anotherFile.o

# 3. 声明伪目标,.PHONY告诉Make:clean和depend是命令目标,不是要生成的文件
.PHONY: clean depend

# 4. 清理命令,删除编译产物和临时文件 rm -f 强制删除
clean:
    rm -f myProgram *.o *.c~ *.h~

# 5. 依赖管理,自动生成头文件依赖,避免手写 .o 依赖哪些 .h
depend:
    makedepend anotherFile.c oneFile.c

# DO NOT DELETE(makedepend会自动维护这里的依赖)
anotherFile.o: anotherHeader.h someHeader.h
oneFile.o: oneHeader.h someHeader.h
Now, when we try to compile an object file from a C file, the default rule will result in
gcc -std=gnu99 -pedantic -Wall -c -o something.o something.cBuilt-in functions
Makefile 函数调用语法:$(函数名 参数1, 参数2, 参数3)(参数间用逗号分隔,部分函数可省略逗号)
CC = gcc
CFLAGS = -std=gnu99 -pedantic -Wall
# 自动收集当前目录下 **所有 `.c` 源文件**,赋值给变量 `SRCS`(比如当前有 `main.c tool.c`,则 `SRCS = main.c tool.c`)
SRCS=$(wildcard *.c)

# 把 `SRCS` 列表中所有 `.c` 结尾的文件名,替换为 `.o` 结尾(比如 `SRCS = main.c tool.c`,则 `OBJS = main.o tool.o`)
OBJS=$(patsubst %.c,%.o,$(SRCS))

myProgram: $(OBJS)
    gcc -o $@ $(OBJS) # `$@` 会被自动替换为当前规则的 “目标文件”
.PHONY: clean depend
clean:
    rm -f myProgram *.o *.c~ *.h~
depend:
    makedepend $(SRCS)
# DO NOT DELETE
anotherFile.o: anotherHeader.h someHeader.h
oneFile.o: oneHeader.h someHeader.h- 当前已有可用于大型项目的 Makefile。
- 新增源文件或在现有源文件中引入新头文件时,仅需执行
make depend以更新依赖信息。 - 除此之外,执行
make即可构建项目,且该命令仅会重新编译必要文件。
In a real project, we likely want to build:
a debug version of our code(调试版)
(with no optimizations, and -ggdb3 to turn on debugging information—see the next module for more info about debugging),and an optimized version of our code that will run faster(优化发布版)
(where the compiler works hard to produce improve the instructions that it generates, but those transformations generally make debugging quite difficulty).
we can just set our Makefile up to build both debug and optimized object files and binaries with different names:
CC = gcc
CFLAGS = -std=gnu99 -pedantic -Wall -O3
DBGFLAGS = -std=gnu99 -pedantic -Wall -ggdb3 -DDEBUG
SRCS=$(wildcard *.c)
OBJS=$(patsubst %.c,%.o,$(SRCS))
DBGOBJS=$(patsubst %.c,%.dbg.o,$(SRCS))
.PHONY: clean depend all
all: myProgram myProgram-debug # 默认目标all
myProgram: $(OBJS)
    gcc -o $@ -O3 $(OBJS)
myProgram-debug: $(DBGOBJS)
    gcc -o $@ -ggdb3 $(DBGOBJS)
%.dbg.o: %.c
    gcc $(DBGFLAGS) -c -o $@ $<
clean:
    rm -f myProgram myProgram-debug *.o *.c~ *.h~
depend:
    makedepend $(SRCS)
    makedepend -a -o .dbg.o  $(SRCS)
# DO NOT DELETE
anotherFile.o: anotherHeader.h someHeader.h
oneFile.o: oneHeader.h someHeader.h
Module 3: Testing and debugging
- Testing: finding bugs
- Debugging: fixing bugs
Step 6: testing
Some programmers advocate a test-first development approach.
Black Box Testing
The testing methodology that most people think of first is black box testing. In black box testing, the tester considers only the expected behavior of the function—not any implementation details—to devise test cases.
Practical Tips for Designing Test Cases:
- Make sure your tests cover every error case. Think about all the inputs that the program cannot handle.
- Be sure to test “too many” as well as “too few”. If a program requires exactly N things, test it with at least one case greater than N and at least one case with fewer than N.
- Any given test case can only test one “error message and exit” condition. This means that if you want to test two different error conditions, you need two different test cases: one for each error condition.
- Test exactly at the boundary of validity.
- Think carefully about whether or not there are any special cases where one particular input value (or set of values has to be treated unusually).
- Think carefully about the requirements, and consider whether something could be misinterpreted, easily mis-implemented, or have variations which could seem correct.
- Think about types.
- Consider any kind of off-by-one error that the programmer might have been able to make.
- Whenever you have a particular type of problem in mind, think about how that mistake would affect the answer relative to the correct behavior, and make sure they are different.
White Box Testing
white box testing involves examining the code to devise test cases. One consideration in white box tests is test coverage—a description of how well your test cases cover the different behaviors of your code.
three levels of test coverage: statement coverage, decision coverage, and path coverage.
- Statement coverage means that every statement in the function is executed.
- decision coverage—in which all possible outcomes of decisions are exercised
- path coverage—test cases must span all possible valid paths through the control flow graph
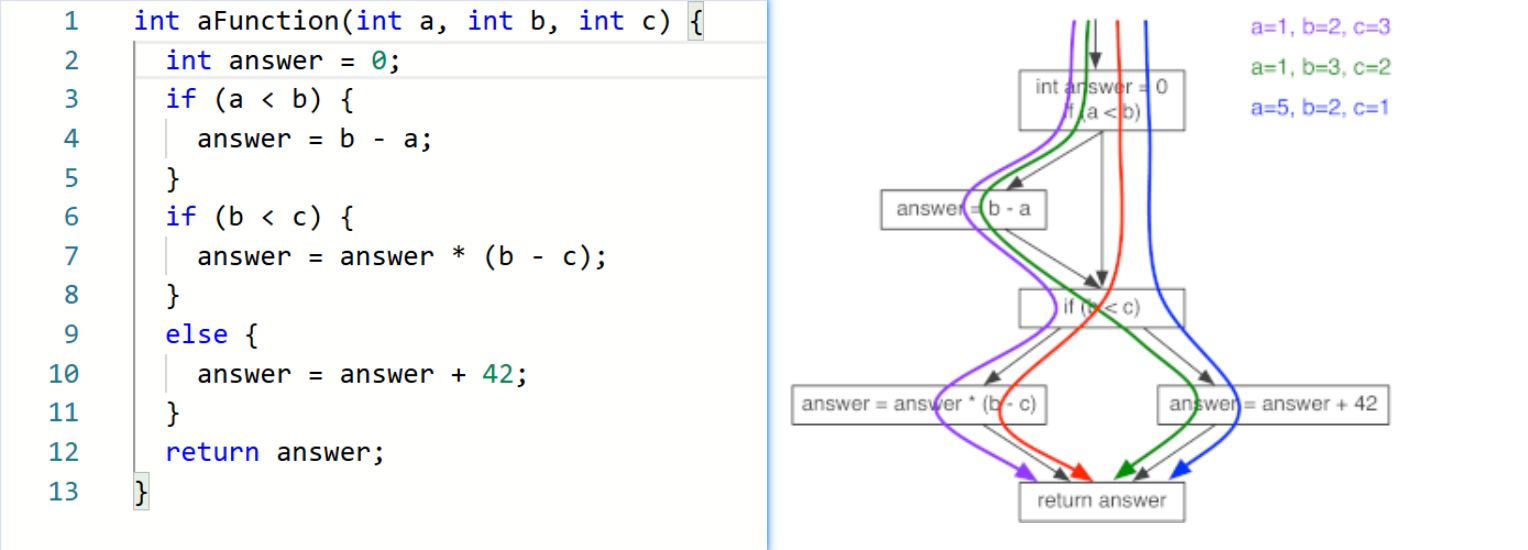 So how do you pick the right level of test coverage? —“it depends”.
Generating test cases
pseudo-random means that the numbers look random (no “obvious” pattern) to a human, but are generated by an algorithm which will produce the same answer each time if they start from the same initial state (called a “seed”).
With random testing, you could run a few thousands or millions of cases, and rely on the Law of Large Numbers to make it likely that you encounter a lot of varieties of relationships between the parameters.
assert statement
assert(expr); checks that expr is true. If it is true, then nothing happens, and execution continues as normal. However, if expr is false, then it prints a message stating that an assertion failed, and aborts the program—terminating it immediately wherever it is.
void printFactors(int n) {
  if (n <= 1) {
    return;
  }
  int p = 2;
  while (!isPrime(n)) {
    assert(isPrime(p));      // p should always be prime
    assert(p < n);           // p should always be less than n
    if (n % p == 0) {
      printf("%d * ", p);
      n = n / p;
    }
    else {
      p = nextPrimeAfter(p); // helper function to get next prime
    }
  }
  printf("%d\n", n);
}
there are performance critical situations where ever bit of speed matters. For these situations, you can pass the -DNDEBUG option to the compiler to turn off the asserts in your optimized code. For all other situations, keeping them active is generally advisable.
Step 7: Debugging
Once you have found a problem in your code, you need to fix it—this process is called debugging.Debugging should be an application of the scientific method.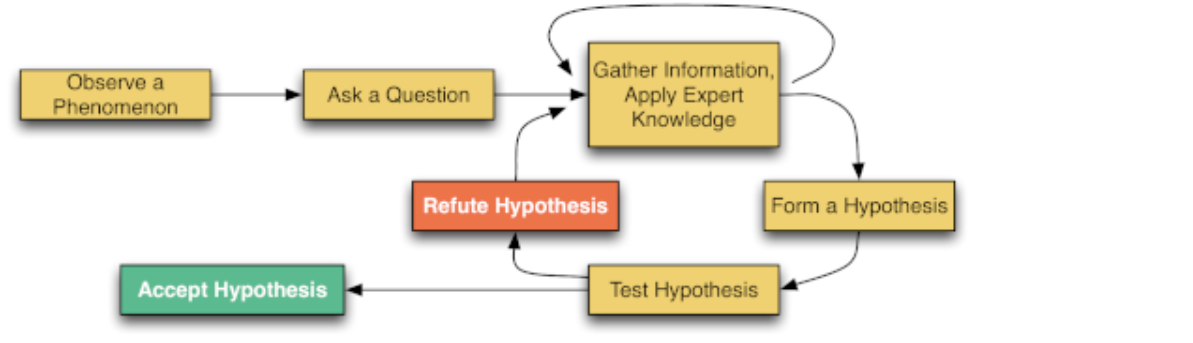
Gather Information, Apply Expert Knowledge
- insert print statements (in C, calls to printf) to display the values of various variables at various points in the program.(many disadvantages)
- use a debugger—One widely used debugger is gdb
Form a Hypothesis
- “My program is broken” is easily verified, but rather useless.
- “My program is dividing by 0 on line 47 for certain inputs” is more useful, but could be improved.
- “My program is dividing by 0 on line 47 if y is odd and z is a perfect square.” This hypothesis is specific and clear
Accept or reject your hypothesis
The Poker Player’s Fallacy — the temptation to make a decision based on prior investments rather than future outcomes. However the smart poker player will only bet on her current hand if she thinks she can win.(沉没成本不参与重大决策)
Similarly, when evaluating whether to modify the current code or throw it away and start fresh, you should not consider how much time you have already put into it, but rather how much time it will take to fix the current code versus redesigning it from scratch.
(比如我当时的毕设项目是继续调试修改我的tensorfolw代码,还是用pytorch重构)
Run program in valgrind
valgrind is particularly good at finding errors in your program that did not manifest simply because you got lucky when you ran it.
We highly recommend running your program in valgrind whenever you are testing your program.
finding problems with Valgrind
valgrind ./yourprogramgdb基本使用:
- 编译准备 (Compilation) 在使用 GDB 之前,必须在编译代码时加入调试符号。
- 推荐参数: 使用
-ggdb3标志(比标准的-g提供更多 GDB 专用的调试信息,如宏定义)。 - 注意: 如果分步编译(先生成对象文件再链接),每一步都必须包含
-ggdb3
- 启动 GDB (Running GDB) 虽然可以在命令行直接运行,但文中推荐在 Emacs 中运行:
- 启动命令: 在 Emacs 中输入
M-x gdb(即Alt-x或Esc-x后输入gdb)。 - 配置: 确认提示行中的程序名称正确。
- 成功标志: 出现名为
*gdb-progname*的缓冲区,并显示(gdb)提示符。 - 常见错误:
- 提示 "no debugging symbols found":说明编译时漏加了调试标志,需重新编译。
- 提示 "No such file or directory":说明当前目录下找不到该程序。
- 核心调试命令 (Core Commands) 当看到
(gdb)提示符时,可以使用以下命令: 程序执行控制:
start:开始(或重启)程序,并在进入main函数时立即暂停。run:运行(或重启)程序,直到遇到断点或程序结束,不会自动在 main 处暂停。step(简写s):单步执行。如果遇到函数调用,会进入该函数内部。next(简写n):单步执行。如果遇到函数调用,直接执行完该函数(不进入内部),停在下一行。 数据查看:print(简写p):计算并打印表达式的值。- 副作用: 表达式中的操作(如
p x=3)会实际修改程序状态。 - 格式化:
p/x以十六进制显示。 - 历史记录: GDB 会将打印过的值保存在
$1,$2等变量中供后续使用。 - 数组查看:
p 数组名[起始索引]@数量(例如p a[0]@5查看数组 a 的前 5 个元素)。
- 副作用: 表达式中的操作(如
display(简写disp):设置自动显示。每次程序暂停(显示提示符)时,都会自动打印该表达式的值(例如display i)。
- 实用技巧
- 重复命令:直接按
Enter键,会重复执行上一次输入的命令(常用于连续执行step或next)。 - 传递参数:
- 方法1:
run arg1 arg2 - 方法2:
set args arg1 arg2
- 方法1:
GDB检查程序运行状态
- 查看调用栈 (Stack Inspection)
- 命令:
backtrace - 功能: 列出当前的函数调用栈帧。
- 顶部是当前正在执行的帧。
- 底部是
main函数。 - 会显示每个函数调用的代码行号。
- 切换栈帧 (Navigating Frames)
- 背景:
print命令只能查看当前作用域内的变量。如果想查看调用者(上一层函数)中的变量,需要切换帧。 - 命令:
up和down- 用于在调用栈中上下移动,改变当前的查看上下文。
- 典型应用场景: 断言失败 (Failed Assert)。
- 当程序因
assert失败停止时,GDB 通常会停在 C 标准库的深处。 - 使用
up命令可以将视角移回你自己的代码中,以便查看导致断言失败的具体位置和上下文。
- 当程序因
- 获取通用信息 (Info Command)
- 命令:
info(配合子命令使用) - 功能: 查看程序的各种元数据和状态。
info frame:描述当前栈帧的内存布局。info types:描述程序中定义的数据类型。help info:查看更多可用的 info 子命令。
breakpoint控制程序执行
- 设置断点 (Breakpoints) 断点能让程序在执行到特定位置时暂停,以便进行检查。
- 设置命令:
break后跟行号或函数名(例如:break main)。 - Emacs 快捷键:
C-x space可在当前光标处设置断点。 - ID 编号: 每个断点都会被分配一个唯一的数字 ID,用于后续操作。
- 继续执行: 设置断点后,使用
run或continue让程序运行直到遇到断点。
- 条件断点 (Conditional Breakpoints) 为了避免在循环(如执行 100 万次)中频繁暂停,可以设置条件断点,仅当满足特定条件(C 语言表达式)时才暂停。
- 创建时设置:
break [位置] if [条件]- 示例:
break 7 if i==250000
- 示例:
- 修改已有断点:
cond [断点ID] [条件]- 示例:
cond 1 i==250000
- 示例:
- 取消条件:
cond [断点ID](不带表达式)会将断点变回无条件断点。
- 管理断点
- 查看状态:
info breakpoints(简写i b),列出所有断点及其 ID。 - 启用/禁用:
enable [ID]或disable [ID]。禁用的断点依然存在但不会触发暂停。 - 删除:
delete [ID]。
- 其他流程控制命令
until:执行直到跳出当前循环(停在循环后的第一行)。适用于不想一步步走完长循环的情况。finish(简写fin):执行直到当前函数返回。适用于想快速结束当前函数调用并返回到调用者的情况。
watchpoint
- 基本用法
- 功能:让 GDB 在表达式的值发生变化时暂停程序。
- 命令:
watch [表达式](例如watch i)。 - 效果:当程序暂停时,GDB 会打印出该表达式的旧值 (Old value) 和 新值 (New value)。
- 解决作用域问题 (Scope Issues)
- 问题: 想通过指针(如
*p)监控一块内存,但指针变量p本身是局部的,当它超出作用域(函数返回)后,GDB 就无法通过变量名p继续监控那块内存了。 - 解决方案: 利用 GDB 的历史变量。
- 先执行
print p:GDB 会显示地址并将其保存到一个内部变量中(例如显示$6 = 0x123456...)。 - 再执行
watch *$6:使用这个内部变量($6)来设置观察点。
- 先执行
- 原理: GDB 的内部变量(
$N)在 GDB 重启前一直有效,不会受程序代码作用域的影响,从而实现对特定内存地址的持续监控。
gdb对Signals的处理
Whenever your program receives a signal, gdb will stop the program and give you control. There are three particularly common signals that come up during debugging
SIGSEGV (Segmentation Fault - 段错误)
- 触发原因:非法内存访问(如访问空指针、数组越界)。
- 调试优势:GDB 会让程序精确地停在导致崩溃的那一行代码上。
- 操作:此时可以直接打印相关变量,检查为何会出现非法访问。
SIGABRT (Abort - 异常终止)
- 触发原因:程序调用了
abort()或assert(断言)失败。 - 调试优势:当断言失败时,程序会暂停。
- 操作: 此时程序通常停在 C 库函数内部,你需要(结合之前学到的)
up命令向上回溯几层栈帧,回到自己的代码中查看导致断言失败的上下文。
- 触发原因:程序调用了
SIGINT (Interrupt - 中断)
- 触发原因:用户手动中断程序。
- 命令行:按
Ctrl-c。 - Emacs 中:按
C-c C-c(两次 Ctrl-c)。
- 命令行:按
- 调试用途:专门用于调试死循环 (Infinite Loop)或程序卡死。
- 操作:
- 在 GDB 中运行程序,等待程序进入卡死状态。
- 发送中断信号(
C-c C-c)。 - 查看程序当前停在哪一行,分析为何逻辑会卡在这里。
Module 4: Project (Texas Hold’em)
了解下指针:
// 1.定义 (Create)
int *ptr;
// 意思是:我申请一张纸条,名字叫 ptr。
// 这里的 * 只是告诉编译器:“ptr 是个指针类型”,仅此而已。
// 2.赋值 (Assign)
ptr = #
// 意思是:把 num 的地址写在 ptr 这张纸条上。
// 注意:这里没有 * 号!我们是直接修改 ptr 本身。

//合写1和2:
int *ptr = # // 这里的 * 只是声明 ptr 的身份。

*ptr = 20; // 这里的 * 是动作:去那个地址,把里面的值改成 20。


const char * str;
// 倒着读:str is a pointer (*) to a char that is const.
// 意思:指针可以变,字符不能变。

char * const str = "hello";
// 倒着读:str is a const pointer (*) to a char.
// 意思:指针本身被锁死了(不能指别处),但字符可以变。
//字符串字面量`"hello"`在 C 语言中本质就是它首字符的地址——所以看似 “直接传字符串”,实际传入的正是地址,但这里编译器会默认在只读数据段存储这段字符。

const char * const str = "hello";
// 指针不能变,字符也不能变。

printf("%s\n", str); //打印指向的字符串
printf("%p\n", str); //打印指针地址
游戏规则(德州扑克)
每位玩家有 2 张底牌(Pocket cards,只有自己能看)。
桌面上会分三轮发出 5 张公共牌(Common cards,大家共有)。
Flop(翻牌):前 3 张公共牌。
Turn(转牌):第 4 张公共牌。
River(河牌):第 5 张公共牌。
玩家从这 7 张牌中凑出最大的 5 张牌组合比大小。
牌局实况:
- 现状:Genevieve 凑成了“顺子”(Straight,五张连续的牌),Drew 凑成了“三条 K
- 悬念:只剩最后一张牌(河牌/River)没发出来。Drew 想要赢,必须拿到特定的牌凑成“葫芦”或“四条”。
- 概率:解说员提到 Drew 的胜率只有 21%。
项目任务
编写 cards.c 文件,实现 cards.h 中声明的一系列函数。这些函数主要负责:
- 验证:检查一张牌的数据是否合法。
- 转换:在“人类可读的字符”和“计算机存储的结构体”之间转换。
- 打印:把牌显示在屏幕上。
- 映射:把 0-51 的数字映射成具体的牌
测试与运行
阶段一:自己测试 (Unit Testing)
- 在
my-test-main.c中编写代码,调用cards.c写的上述函数,打印结果,看看是否符合预期。 - 在终端输入
make或make test。 - 这将编译你的
cards.c和my-test-main.c,并生成可执行文件。
阶段二:运行完整模拟 (Integration)
当确信函数都没问题了:
- 在终端输入
make poker。 - 这将把你的
cards.c和课程提供的预编译文件(.o)链接在一起。 - 运行生成的程序,并提供一个输入文件。
- 扑克模拟的输入格式 (关于 Input File)
当你运行最终的 poker 程序时,它需要读取文件来设定牌局。格式如下:
- 例子:
As Ah Kc Qd 6c ?0 ?1 - 含义:
As Ah:玩家手里的牌(黑桃A,红桃A)。Kc Qd 6c:桌面上已知的公共牌(翻牌)。?0 ?1:未知牌的占位符。程序会用蒙特卡洛模拟来随机填充这几张牌,计算胜率。- 如果是多行,代表多个玩家在对局。
项目代码
cards.h
#ifndef CARD_H
#define CARD_H
#define VALUE_ACE 14
#define VALUE_KING 13
#define VALUE_QUEEN 12
#define VALUE_JACK 11

typedef enum {
  SPADES,
  HEARTS,
  DIAMONDS,
  CLUBS,
  NUM_SUITS
} suit_t;

struct card_tag {
  unsigned value;
  suit_t suit;
};
typedef struct card_tag card_t;

typedef enum {
  STRAIGHT_FLUSH, //同花顺(最强牌型,如 10-J-Q-K-A 同花色)
  FOUR_OF_A_KIND, //四条(四张同点数牌,如四张 5)
  FULL_HOUSE, //葫芦(三张同点 + 一对,如三张 3 + 一对 7)
  FLUSH, //同花(五张同花色但不成顺子)
  STRAIGHT, //顺子(五张点数连续但不同花色)
  THREE_OF_A_KIND, //三条(三张同点数牌)
  TWO_PAIR, //两对(两组不同的对子,如一对 2 + 一对 9)
  PAIR, //一对(仅一组对子)
  NOTHING //无牌型(最弱,五张牌无上述任何组合)
} hand_ranking_t;

//some function prototypes.
card_t card_from_num(unsigned c);
void assert_card_valid(card_t c);
const char * ranking_to_string(hand_ranking_t r) ;
char value_letter(card_t c);
char suit_letter(card_t c) ;
void print_card(card_t c);
ard_t card_from_letters(char value_let, char suit_let);
#endif
makefile
CFLAGS=-ggdb3 -Wall -Werror -pedantic -std=gnu99
GIVEN_OBJS=deck.o  eval.o  future.o  input.o  main.o eval-c4.o deck-c4.o

test: cards.o my-test-main.o
    gcc -o test -ggdb3 cards.o my-test-main.o
poker: $(GIVEN_OBJS) cards.o
    gcc -o poker -ggdb3  cards.o $(GIVEN_OBJS)
clean:
    rm test poker cards.o my-test-main.o *~
cards.c
#include <stdio.h>
#include <stdlib.h>
#include <assert.h>
#include "cards.h"

/* * 检查牌是否合法
 * 依据 cards.h: value 范围是 2 到 VALUE_ACE(14), suit 范围是 SPADES 到 CLUBS
 */
void assert_card_valid(card_t c) {
    assert(c.value >= 2 && c.value <= VALUE_ACE);
    assert(c.suit >= SPADES && c.suit <= CLUBS);
}

/* * 将牌型枚举转换为字符串
 * 枚举名与 cards.h 完全对应
 */
const char * ranking_to_string(hand_ranking_t r) {
    switch(r) {
        case STRAIGHT_FLUSH:  return "STRAIGHT_FLUSH";
        case FOUR_OF_A_KIND:  return "FOUR_OF_A_KIND";
        case FULL_HOUSE:      return "FULL_HOUSE";
        case FLUSH:           return "FLUSH";
        case STRAIGHT:        return "STRAIGHT";
        case THREE_OF_A_KIND: return "THREE_OF_A_KIND";
        case TWO_PAIR:        return "TWO_PAIR";
        case PAIR:            return "PAIR";
        case NOTHING:         return "NOTHING";
        default:              return "UNKNOWN";
    }
}


/* * 获取牌面点数的字符表示
 * 10 映射为 '0', A, K, Q, J 映射为对应首字母
 */
char value_letter(card_t c) {
    if (c.value >= 2 && c.value <= 9) {
        return '0' + c.value; // 字符就是数字,对数字value进行ASCII码偏移,得到字符
    }
    switch (c.value) {
        case 10:          return '0';
        case VALUE_JACK:  return 'J';
        case VALUE_QUEEN: return 'Q';
        case VALUE_KING:  return 'K';
        case VALUE_ACE:   return 'A';
        default:          return '?';
    }
}


/* * 获取花色的字符表示
 */
char suit_letter(card_t c) {
    switch (c.suit) {
        case SPADES:   return 's';
        case HEARTS:   return 'h';
        case DIAMONDS: return 'd';
        case CLUBS:    return 'c';
        default:       return '?';
    }
}


/* * 打印牌面,无换行
 */
void print_card(card_t c) {
    printf("%c%c", value_letter(c), suit_letter(c));
}


/* * 从字符构建牌结构体
 */
card_t card_from_letters(char value_let, char suit_let) {
    card_t temp;
    // 解析点数
    if (value_let >= '2' && value_let <= '9') {
        temp.value = value_let - '0';
    } else {
        switch(value_let) {
            case '0': temp.value = 10; break;
            case 'J': temp.value = VALUE_JACK; break;
            case 'Q': temp.value = VALUE_QUEEN; break;
            case 'K': temp.value = VALUE_KING; break;
            case 'A': temp.value = VALUE_ACE; break;
            default:
                // 遇到非法字符,报错并退出
                fprintf(stderr, "Error: Invalid value letter '%c'\n", value_let);
                exit(EXIT_FAILURE);
        }
    }

    // 解析花色
    switch(suit_let) {
        case 's': temp.suit = SPADES; break;
        case 'h': temp.suit = HEARTS; break;
        case 'd': temp.suit = DIAMONDS; break;
        case 'c': temp.suit = CLUBS; break;
        default:
            // 遇到非法花色,报错并退出
            fprintf(stderr, "Error: Invalid suit letter '%c'\n", suit_let);
            exit(EXIT_FAILURE);
    }

    assert_card_valid(temp);
    return temp;
}


/* * 将数字 0-51 映射为唯一的牌
 */
card_t card_from_num(unsigned c) {
    card_t temp;
    // 使用强制类型转换 (suit_t) 消除潜在的编译器警告
    temp.suit = (suit_t)(c / 13);
    temp.value = (c % 13) + 2; //牌点数是从2开始的

    // 虽然输入通常是安全的,但在返回前检查一下总是好的
    assert_card_valid(temp);
    return temp;
}
测试文件my-test-main.c
#include <stdio.h>
#include "cards.h"

int main(void) {
    print_card(card_from_num(15));
    hand_ranking_t r = FULL_HOUSE;
    printf("%s\n", ranking_to_string(r));
    printf("%p\n", ranking_to_string(r));
    char value_let = '5';
    char suit_let = 'd';
    print_card(card_from_letters(value_let, suit_let));
    return 0;
}
输入与输出
input.txt
As Ah Kc Qd 6c ?0 ?1
2c 3d Kc Qd 6c ?0 ?1
Ks Qs Kc Qd 6c ?0 ?1
输出:
$ ./poker input.txt

Hand 0 won 2615 / 10000 times (26.15%)
Hand 1 won 631 / 10000 times (6.31%)
Hand 2 won 6754 / 10000 times (67.54%)
And there were 0 ties
课程2心得感悟
Course2的内容比Course1要丰富许多,这次见到的基本都是之前没有学过的新知识,主要包括7步编程法的后3步(算法翻译成代码、测试代码、debug调试代码)。新的知识有编译compilling、make和makefile,这些都是之前懵懵懂懂的概念,实操后思路就清晰多了。然后还了解了一些测试代码的思想,虽然测试是一个苦活,但是在整个项目开发中也算是非常重要的一环了。最后是关于调试代码的思路,调试我还是比较熟悉的,毕竟用python和matlab也调试过不少代码。
除了这些有用的编程、测试、调试思想,还学习了许多使用工具。比如emacs编辑器,git,valgrind、gdb,虽然还是入门阶段,上手实操过后基本使用不成问题。但是对一套目前工业界开发项目的标准工具使用流程方法,还是不太明白,感觉目前掌握的工具使用还是比较low。
总结下也是一个星期的学习,收获确实很大。


